

Mastering Attaching Fiber Cement Siding: Essential Tips


Fiber cement siding installation rewards careful planning more than brute force. The material is durable, attractive, and widely used, but it is also heavy, dusty to cut, and unforgiving when fasteners are placed poorly. With the right tools, safety gear, and layout habits, fiber cement board siding installation becomes cleaner, straighter, and far less stressful for a DIY crew or a contractor-led project.
What tools do you need for fiber cement siding installation?
You need measuring and layout tools, safe cutting tools, corrosion-resistant fasteners, fastening equipment, siding support gauges, personal protective equipment, and moisture-management supplies. The best setup is not always the most expensive one; it is the setup that helps you cut accurately, control dust, hold boards level, and fasten each piece without cracking or overdriving it.
Start with the basics: a tape measure, chalk line, level, speed square, utility knife, pry bar, hammer, drill or driver, caulk gun, and sturdy ladders or scaffolding. These everyday tools handle layout, trim work, touch-ups, and access. For installing cement siding efficiently, however, a few specialty tools make a noticeable difference.
Your core tool checklist should include:
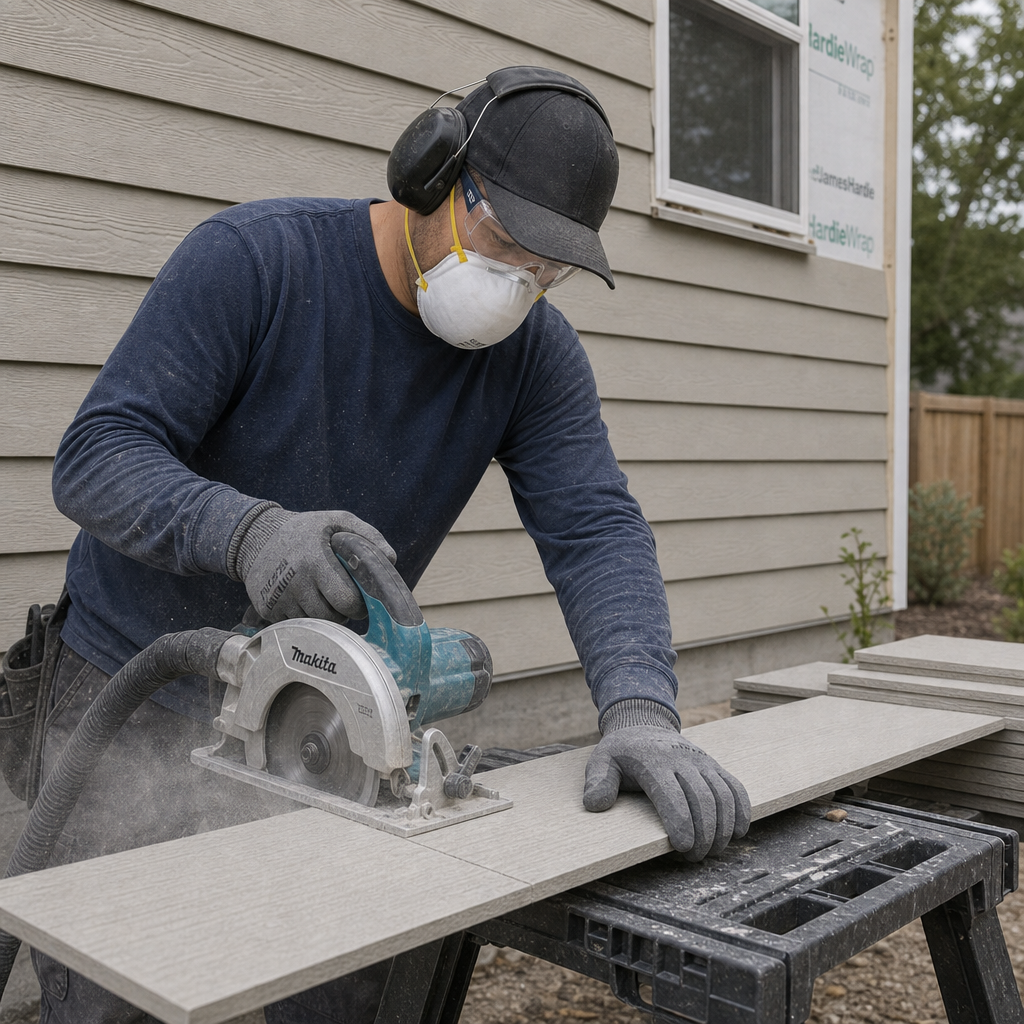
- Circular saw with a fiber cement blade for long, straight cuts. A polycrystalline diamond-tipped blade is often preferred because it cuts cleaner and lasts longer than a general-purpose blade.
- Fiber cement shears for smaller cuts, notches, and lower-dust cutting situations.
- Pneumatic siding nailer for fast, consistent fastening across long wall runs.
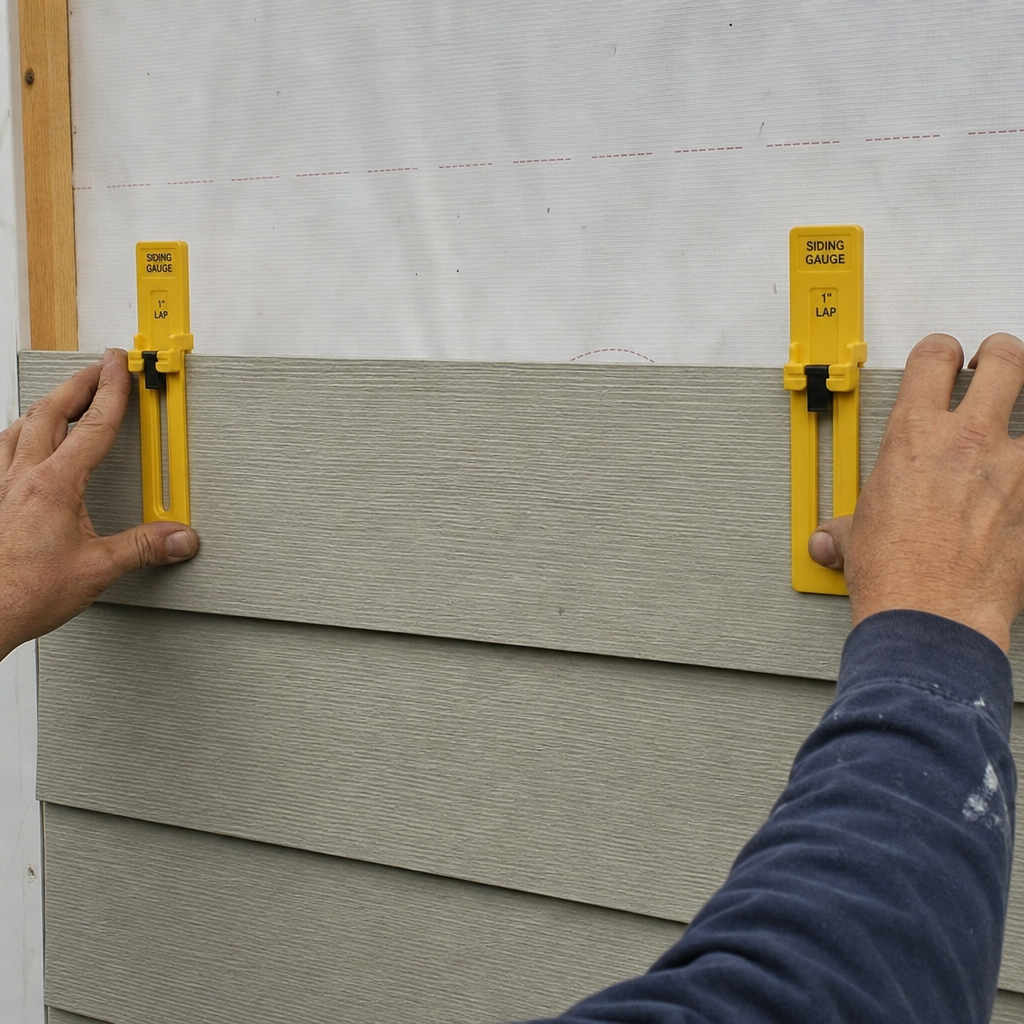
- Siding gauges or lap gauges to hold boards at a consistent reveal, especially useful for one-person fiber siding installation.
- Dust control equipment, such as a saw attachment, HEPA-rated vacuum system, or outdoor cutting station.
- Respirator, eye protection, hearing protection, and gloves for safer handling and cutting.
- Flashing, housewrap, caulk, primer, and paint to protect penetrations, joints, and cut edges.
Cutting tools that keep boards clean and manageable
Fiber cement can chip if you cut it with the wrong blade or rush the saw through the board. A circular saw fitted with a blade designed for fiber cement is the standard choice for full-length cuts, trimming boards to length, and working through a stack of repeated measurements. Cut with the finished face down when recommended by the product instructions, support the board fully, and let the blade do the work instead of forcing the cut.
Fiber cement shears are slower than a circular saw but much cleaner for dust control. They are helpful for small jobs, repairs, and cuts near corners, windows, or vents where precision matters. They also reduce airborne dust, which is one reason many installers keep them nearby even when a saw is the main cutting tool.
A jigsaw with the right blade can help with curved cuts and odd shapes, but it should not be your primary tool for long siding runs. For penetrations around pipes, lights, or outlets, use a carbide-grit hole saw or appropriate masonry-rated bit. Whatever tool you choose, test on scrap first so you know how the board behaves before cutting a visible piece.
Safety gear is not optional
The biggest safety concern during fiber cement siding installation is dust from cutting. Fiber cement products can release respirable crystalline silica when sawed, drilled, or ground, so dust control should be part of the plan before the first board is cut. Cutting outdoors, keeping bystanders away, using dust collection, and wearing a properly fitted respirator are practical steps that reduce exposure.
At minimum, your safety setup should include:
- N95 respirator or better, with a proper fit and clean filters.
- Safety glasses or goggles to protect against chips and windblown dust.
- Work gloves because board edges can be rough and panels are heavy.
- Hearing protection when using saws, nailers, and compressors.
- Long sleeves for comfort when carrying and positioning panels.
- Stable staging, such as scaffolding or properly placed ladders, so you are not fighting the weight of the material while off balance.
Handling matters as much as cutting. Carry long boards vertically with help whenever possible, and store them flat, dry, and supported. If boards flex too much, they can crack before they ever reach the wall.
Wall preparation sets the quality of the finished siding
Good siding work starts before the first board goes up. The wall should be flat, sheathed properly, and covered with an approved water-resistive barrier. Flashing should be installed around windows, doors, band boards, roof intersections, and any place water could collect or move behind the siding.
Use a level and chalk line to establish a straight starter course. Do not assume the foundation, deck, or old siding line is perfectly level. A small error in the first course can become obvious across a full wall, especially with long horizontal lap siding.
Before attaching fiber cement siding, confirm clearances required by the manufacturer and local code. Many installations call for keeping siding several inches above grade and leaving small gaps near trim, corners, and penetrations so the material has room to move and so moisture does not wick into the board. A common planning detail is a small gap, often around 1/8 inch, where siding meets trim, but the exact requirement should come from the product instructions.
How do you nail fiber cement siding correctly?
To nail fiber cement siding correctly, use corrosion-resistant fasteners, place them where the manufacturer specifies, drive them flush with the surface, and hit solid framing or approved sheathing. The goal is firm attachment without crushing the board, cracking the edge, or leaving proud nail heads that interfere with the next course.
For most lap siding work, a pneumatic siding nailer is the most efficient tool. It helps keep depth consistent, which is essential because overdriven nails weaken the hold and can fracture the material. Underdriven nails, on the other hand, leave bumps that affect the board above and may create a wavy appearance.
When learning how to nail fiber cement siding, focus on these fastening habits:
- Use the right fastener. Choose hot-dipped galvanized or stainless steel nails or approved screws. Corrosion-resistant fasteners help prevent rust stains and long-term failure.
- Fasten into solid backing. Nails commonly need to penetrate framing by about 1 1/4 inches, but always confirm the requirement for the specific siding product.
- Keep fasteners flush. The head should sit flat against the siding, not sunk below the surface and not sticking out.
- Respect edge distances. Nailing too close to an edge can split or crack the board.
- Follow the layout. Mark studs or use a chalk line so fasteners line up neatly and consistently.
- Do not guess on blind nailing or face nailing. Some profiles are blind-nailed near the top edge, while others may require face nailing in specific conditions.
Hand-nailing can work for small repairs or tight spots, but it is slower and less consistent. If you are doing a full fiber cement board siding installation, a siding nailer is usually worth renting or buying because it reduces fatigue and helps create a cleaner finished wall.
Specialty tools make solo work straighter
Fiber cement boards are awkward because they are long, dense, and brittle at the edges. Siding gauges solve a common problem: holding the board at the correct exposure while you fasten it. They clip onto the previous course, support the next board, and help maintain a straight reveal without needing an extra person at every step.
A pair of gauges can be especially helpful when installing long runs, working above shoulder height, or trying to maintain consistent spacing around windows and doors. They do not replace a level or chalk line, but they make it easier to keep the work aligned between reference marks. For homeowners researching how to install hardiplank siding or similar lap siding, gauges are one of the simplest upgrades that can make the project feel more controlled.
Other useful specialty items include a reveal block, joint flashing, a siding removal tool for repairs, and a depth-adjustable nailer. None of these tools compensate for poor planning, but they reduce the small errors that show up as crooked courses, chipped corners, or uneven joints.
Moisture-management supplies protect the investment
Fiber cement is durable, but the wall system still depends on smart water management. That means housewrap, flashing, caulk, primer, paint, and proper clearances all matter. Water should be directed out and away, not trapped behind trim or allowed to sit against cut edges.
Keep these supplies within reach during installation:
- Water-resistive barrier installed according to the product and code requirements.
- Metal or approved flashing above horizontal trim, windows, doors, and wall penetrations.
- Joint flashing behind butt joints when required.
- Exterior-grade sealant for approved joints and gaps.
- Primer or touch-up paint for exposed cut edges.
- Paintable caulk compatible with fiber cement and exterior finishes.
Sealing cut edges is a small step with a large impact. Fresh cuts expose the core of the board, so priming or painting them before installation helps reduce moisture absorption. Do this as you work rather than waiting until the wall is complete, because some edges become difficult to reach once boards overlap.
Common mistakes that make installation harder
Many problems in fiber siding installation come from rushing the setup. A crooked starter strip, missing flashing, or inconsistent nail depth can affect the whole wall. The material itself is strong, but it does not forgive careless handling.
Avoid these common mistakes:
- Cutting indoors or in an enclosed area without dust collection.
- Using framing nails or interior screws that are not approved for exterior siding.
- Overdriving nails until the surface dimples or cracks.
- Skipping layout lines and trying to “eyeball” long courses.
- Letting board ends butt tightly against trim without the required gap.
- Forgetting to seal cut edges before they are covered.
- Working alone without gauges or supports on long boards.
- Ignoring the manufacturer’s installation guide for exposure, clearance, and fastening details.
If something looks wrong after a course is installed, fix it immediately. It is much easier to correct one board than to remove several courses after a mistake has repeated up the wall.
A practical setup for a smoother siding day
Before you begin attaching fiber cement siding, organize the work area into stations. Keep cutting in one area, staging in another, and fastening tools at the wall. This reduces wasted movement and keeps dust away from people who are measuring, painting edges, or handling clean boards.
A simple workflow looks like this:
- Inspect the wall, barrier, flashing, and trim details.
- Mark studs and snap level layout lines.
- Measure each run carefully, allowing required gaps.
- Cut boards outside or with dust collection.
- Seal fresh cut edges before carrying boards to the wall.
- Use gauges or blocks to set the reveal.
- Fasten with approved nails or screws at the proper depth.
- Check level, joints, and clearances as you move up the wall.
- Caulk only where the siding instructions call for it.
- Touch up exposed fasteners or cuts as needed.
This rhythm keeps the project predictable. It also helps you catch small issues before they become expensive repairs.
Final takeaway
The essential tools for fiber cement siding installation are the ones that help you control three things: cut quality, fastening accuracy, and moisture protection. A fiber cement blade, siding nailer, lap gauges, respirator, flashing supplies, and edge-sealing materials all play a direct role in the finished result.
Whether you are installing cement siding yourself or preparing to oversee a contractor, do not treat the tool list as an afterthought. The right setup makes the work safer, the courses straighter, and the siding more likely to perform as intended for years.