

Attaching Fiber Cement Siding: Installation Guide


Fiber cement siding is durable, attractive, and built to handle tough exterior conditions, but it rewards careful installation. The right tools help you cut cleaner, fasten securely, manage dust, protect the wall from moisture, and avoid the small mistakes that lead to callbacks or repairs. Whether you are planning fiber cement board siding installation on a new build or replacing old siding on an existing home, preparation matters as much as the boards themselves.
What tools do you need for fiber cement siding installation?
For fiber cement siding installation, you need measuring and layout tools, dust-safe cutting equipment, corrosion-resistant fasteners, fastening tools, flashing materials, weather-resistant barrier supplies, caulk, paint or primer for exposed cuts, and personal protective equipment. Fiber cement is heavier and more abrasive than many siding materials, so ordinary carpentry tools may not be enough unless they are paired with the right blades, dust controls, and installation accessories.
A practical starter kit includes:
- Measuring tape, chalk line, speed square, and level for accurate layout
- Circular saw with a fiber cement or carbide-tipped blade, or fiber cement shears for cleaner dust control
- Drill or impact driver for trim, accessories, and areas where screws are required
- Pneumatic siding nailer or coil nailer, set carefully to avoid overdriving
- Hot-dipped galvanized or stainless steel siding nails, depending on exposure and local requirements
- Caulk gun and high-quality exterior sealant compatible with fiber cement
- Utility knife, snips, and flashing tape for weather barrier work
- Metal flashing for windows, doors, penetrations, and butt joints
- Safety glasses, hearing protection, gloves, and a respirator or approved dust mask
- Sawhorses or a cutting station that supports long boards safely
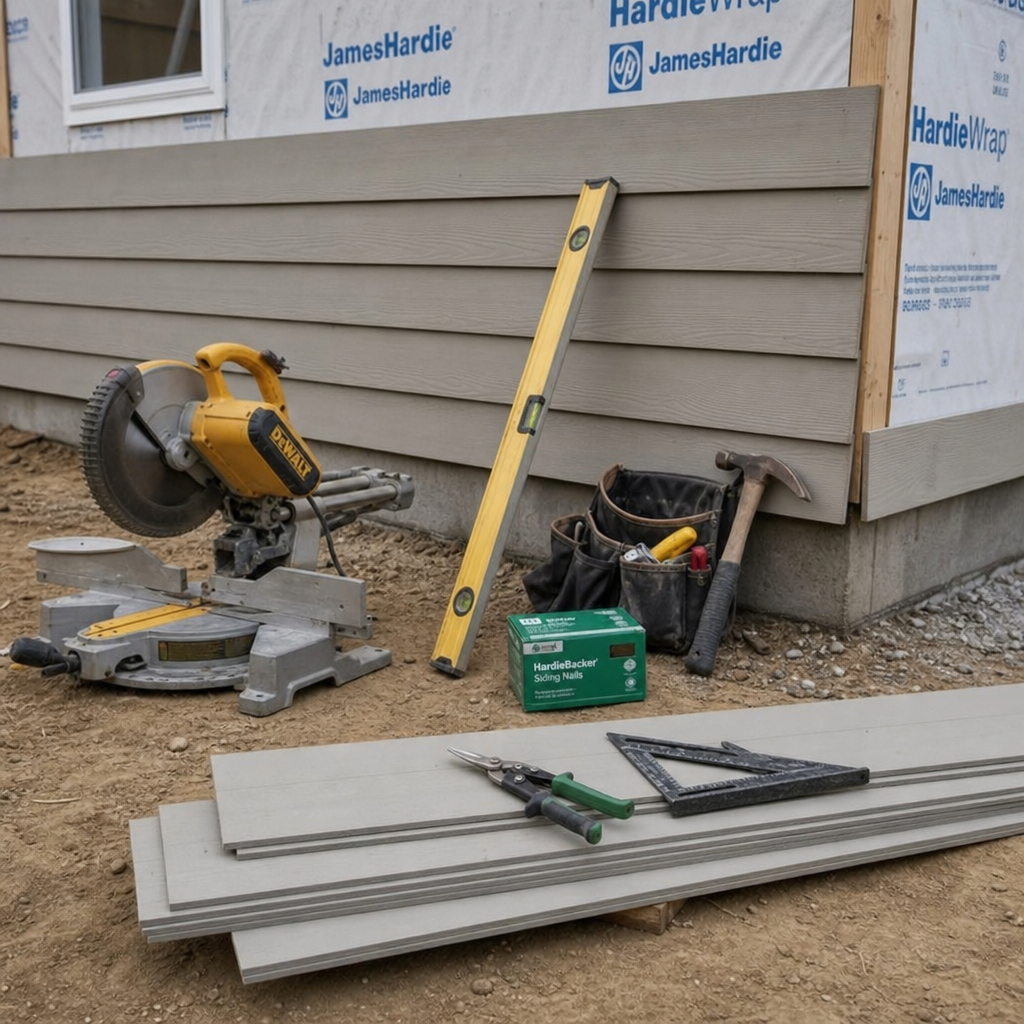
These tools are not just conveniences. They reduce chipping, help maintain consistent overlaps, prevent crushed boards, and make it easier to keep water moving outward instead of behind the siding.
Cutting tools that protect the board and the installer
Cutting is one of the most important parts of installing cement siding because it affects fit, finish, and jobsite safety. Fiber cement contains mineral materials that create fine dust when cut with a saw. That dust should be controlled with outdoor cutting, ventilation, dust collection where possible, and proper respiratory protection.
A circular saw fitted with a blade designed for fiber cement is common for straight cuts. These blades are made to reduce wear and produce a cleaner edge than a general-purpose framing blade. Many installers cut boards face down or upside down to reduce visible chipping on the finished face, but you should always follow the siding manufacturer’s instructions for your specific product.
Fiber cement shears are another strong option. They create less airborne dust than saw cutting and work well for straight or slightly irregular cuts, especially when working near occupied areas. The tradeoff is that shears can be slower and may leave a rougher edge, depending on the tool and board.
For notches around windows, hose bibs, light blocks, and vents, a jigsaw with an appropriate blade or an oscillating tool may help. Keep cuts neat but do not rely on caulk to hide poor fitting. A well-planned cut with proper clearance is easier to seal and looks better after paint.
Wall preparation sets the job up for long-term performance
The best siding tools cannot compensate for a poorly prepared wall. Before fiber siding installation begins, the sheathing should be sound, flat, and repaired where rot, swelling, or damage is present. On retrofit projects, old siding often hides water issues, so this stage deserves patience.
Install a weather-resistant barrier over the sheathing according to local code and product instructions. Seams should be lapped to shed water, not trap it, and compatible tape should be used where required. Around windows and doors, flashing must direct water out and over the layer below it. Think of the wall as a drainage system: every piece should encourage water to move down and out.
Pay close attention to penetrations. Electrical boxes, vents, hose connections, and meter areas need careful flashing or blocks so water does not collect behind the siding. If a wall assembly uses exterior insulation, furring strips, rainscreen details, or special fasteners may be required. Codes, climate, and manufacturer instructions can vary, so confirm details before attaching fiber cement siding.
Key prep checks before the first board goes up:
- Confirm the sheathing is solid, dry, and properly fastened.
- Install the weather-resistant barrier with correct laps.
- Flash windows, doors, and penetrations before siding covers the area.
- Mark studs clearly so fasteners hit framing.
- Check required clearances from grade, roofing, decks, and hard surfaces.
- Plan starter strips, trim thickness, and reveal lines before cutting boards.
How do you nail fiber cement siding correctly?
To nail fiber cement siding correctly, use approved corrosion-resistant siding nails, drive them into framing where required, keep them straight and snug, and avoid overdriving them into the face of the board. A common lap siding approach is blind nailing near the top of each plank so the course above covers the fasteners, but exact placement depends on the product, wind exposure, stud layout, and manufacturer instructions.
If you are learning how to nail fiber cement siding, the biggest rule is simple: the nail should hold the board, not crush it. Overdriven nails can fracture the material, reduce holding power, and create low spots that collect moisture. Underdriven nails can hold the next course out of plane and create visible waves. Set the air pressure on your nailer using scrap pieces first, then check the results often as compressor pressure changes.
Fasteners should be suitable for exterior exposure. Hot-dipped galvanized nails are common, while stainless steel may be recommended in coastal or highly corrosive environments. Nails must be long enough to meet the required penetration into framing or an approved substrate. Do not guess on this detail; the difference between a secure wall and a loose one often comes down to fastener length and placement.
Helpful fastening habits include:
- Mark studs on the weather barrier so you are not searching while holding a board.
- Keep nails perpendicular to the siding surface.
- Leave manufacturer-recommended gaps where boards meet trim or other materials.
- Do not nail too close to board ends, corners, or edges.
- Use face nailing only where allowed or required for the product and exposure.
- Replace cracked or damaged boards instead of trying to hide structural damage with paint.
Layout and handling make the finished wall look professional
Fiber cement boards are long, somewhat flexible, and heavy enough to crack if mishandled. Carry boards vertically when recommended, support them along their length, and avoid lifting them by one end. A second person or siding gauges can make a major difference in keeping courses straight and reveals consistent.
Start with a level reference line. If the first course is off, every course above it will repeat the problem. Starter strips help angle the first plank properly so it matches the courses above. Siding gauges or story poles can speed installation and keep the reveal consistent across large wall sections.
Butt joints need planning. Avoid stacking joints directly above each other because it draws the eye and can create a weak visual pattern. On many lap siding jobs, joints are staggered across different studs, and flashing is placed behind the joint to move incidental water outward. Some systems require joint treatment, caulk, or factory-finished ends, while others discourage caulking certain butt joints. Follow the product instructions rather than applying one habit to every brand.
When people search for how to install hardiplank siding, they are often referring to lap-style fiber cement planks in general. HardiePlank and other fiber cement products share many installation principles, but details such as clearance, fastener schedules, joint treatment, and finishing can differ. Treat the manufacturer’s guide as the controlling document for the product in your hands.
Weatherproofing, trim, and finishing details
Water management is where many siding jobs succeed or fail. Fiber cement itself is durable, but the wall behind it still needs protection. Flashing should be layered so upper materials overlap lower materials, similar to shingles on a roof. This is especially important above windows, doors, horizontal trim bands, deck ledgers, rooflines, and any place water can slow down or splash.
Trim should be installed with the proper thickness and spacing so siding courses terminate cleanly. Leave required gaps where siding meets trim, then seal only the joints the manufacturer tells you to seal. Use a paintable exterior sealant compatible with both the siding and trim. Caulk is not a substitute for flashing, and thick beads should not be used to bridge sloppy cuts.
Exposed cut edges may need primer or paint, especially where boards are cut in the field. This helps reduce moisture absorption and keeps the finish more uniform. If you are installing prefinished siding, use the approved touch-up method sparingly and neatly. Too much touch-up material can become more visible than the cut itself.
Common mistakes to avoid during installation
Even experienced DIYers can run into trouble with fiber cement because it behaves differently from vinyl, wood, or engineered wood siding. Most mistakes are preventable when you slow down at layout, cutting, and fastening stages.
Watch for these issues:
- Skipping dust protection: Saw cutting without respiratory protection and dust control creates an avoidable health risk.
- Overdriving fasteners: Nails sunk too deeply can crack boards and weaken attachment.
- Poor flashing: Water intrusion often starts at windows, doors, penetrations, and butt joints.
- Ignoring clearances: Siding installed too close to soil, paving, decks, or roofing may absorb splashback or debris.
- Forgetting cut-edge treatment: Raw cuts can become weak points if the product requires sealing.
- Using the wrong blade: A standard wood blade can chip the face and wear quickly.
- Rushing wall prep: Installing over damaged sheathing or old moisture problems only hides the issue temporarily.
A practical workflow for a cleaner siding job
A consistent workflow keeps the project organized and reduces rework. Begin by reviewing the siding manufacturer’s instructions and local code requirements. Then inspect the wall, repair damage, and install the weather barrier and flashing before any siding goes up.
Next, establish level lines and plan your course layout. Precut only when measurements are reliable, because walls, trim, and openings are rarely perfect. Set up a safe cutting area away from doors, windows, and people. Keep boards organized by wall section so you are not carrying heavy material more than necessary.
As installation begins, check every few courses for level, reveal consistency, and joint placement. Adjust early rather than forcing corrections near the top of the wall. Keep sealant, flashing, and fasteners nearby so each course can be completed properly before it is covered. This approach is slower than simply nailing boards as fast as possible, but it leads to a cleaner and more durable result.
What to Consider for Fiber Cement Siding Installation
Successful fiber cement board siding installation comes down to the right tools, careful wall preparation, safe cutting, and disciplined fastening. If you understand how to nail fiber cement siding, manage moisture with proper flashing, and finish cut edges correctly, the siding is far more likely to look sharp and perform well over time.
Before attaching fiber cement siding, confirm the product instructions, local code requirements, and site conditions. With the right setup and a patient workflow, fiber cement siding installation becomes less intimidating and much more predictable.